Add a webhook destination
Set up an address that receives a signed message whenever chosen events happen in your Laramin: pick the events, add filters and headers, choose how deliveries are signed, and set a rate limit.
- Applies to
- Webhook Engine 2.2 and later
- Who can do this
- Platform owner, Administrator
- Permission
feature.webhook. destination. create - Where
- Webhook Engine › Destinations
On this page
A destination is an address on another system, such as your CRM, a chat tool or your own app, that should hear about events in your Laramin. Add one destination per receiving system.
Before you start
- You need Create Destination (
feature.). To open the list you need List Destination (webhook. destination. create feature.), and to change a destination later, Edit Destination (webhook. destination.list feature.).webhook. destination.edit - Get the receiving address from whoever runs the receiving system, for example
https://hooks.example.com. Ask them whether their receiver checks the timestamp-bound signature (version 2). New receivers should./laramin - Your Laramin's queue worker must be running, or deliveries wait and are never sent.
Steps
-
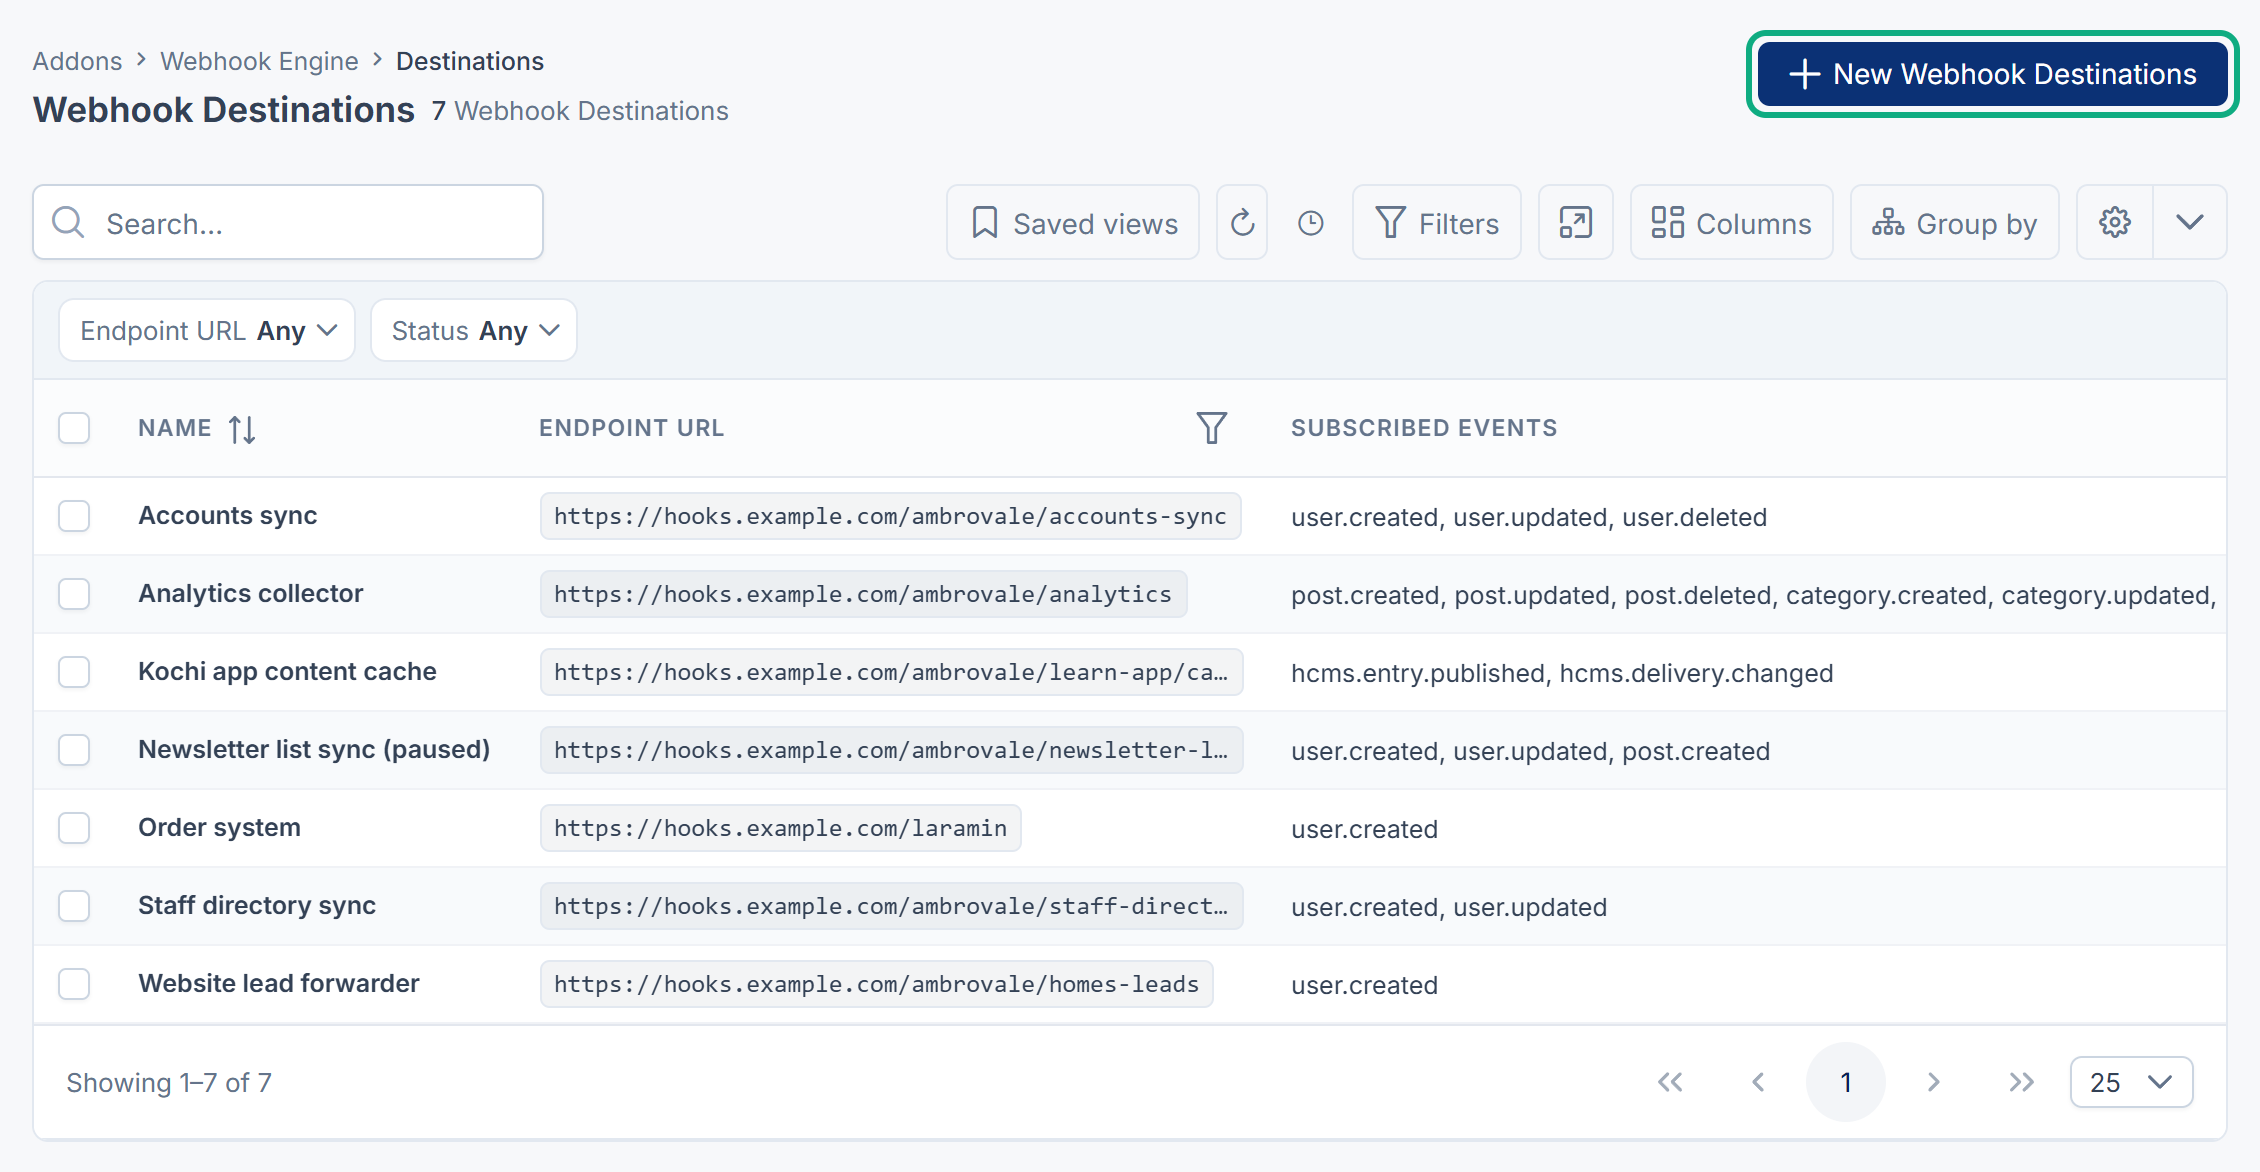
In the sidebar, open Webhook Engine › Destinations.
-
Select New Webhook Destinations.
-
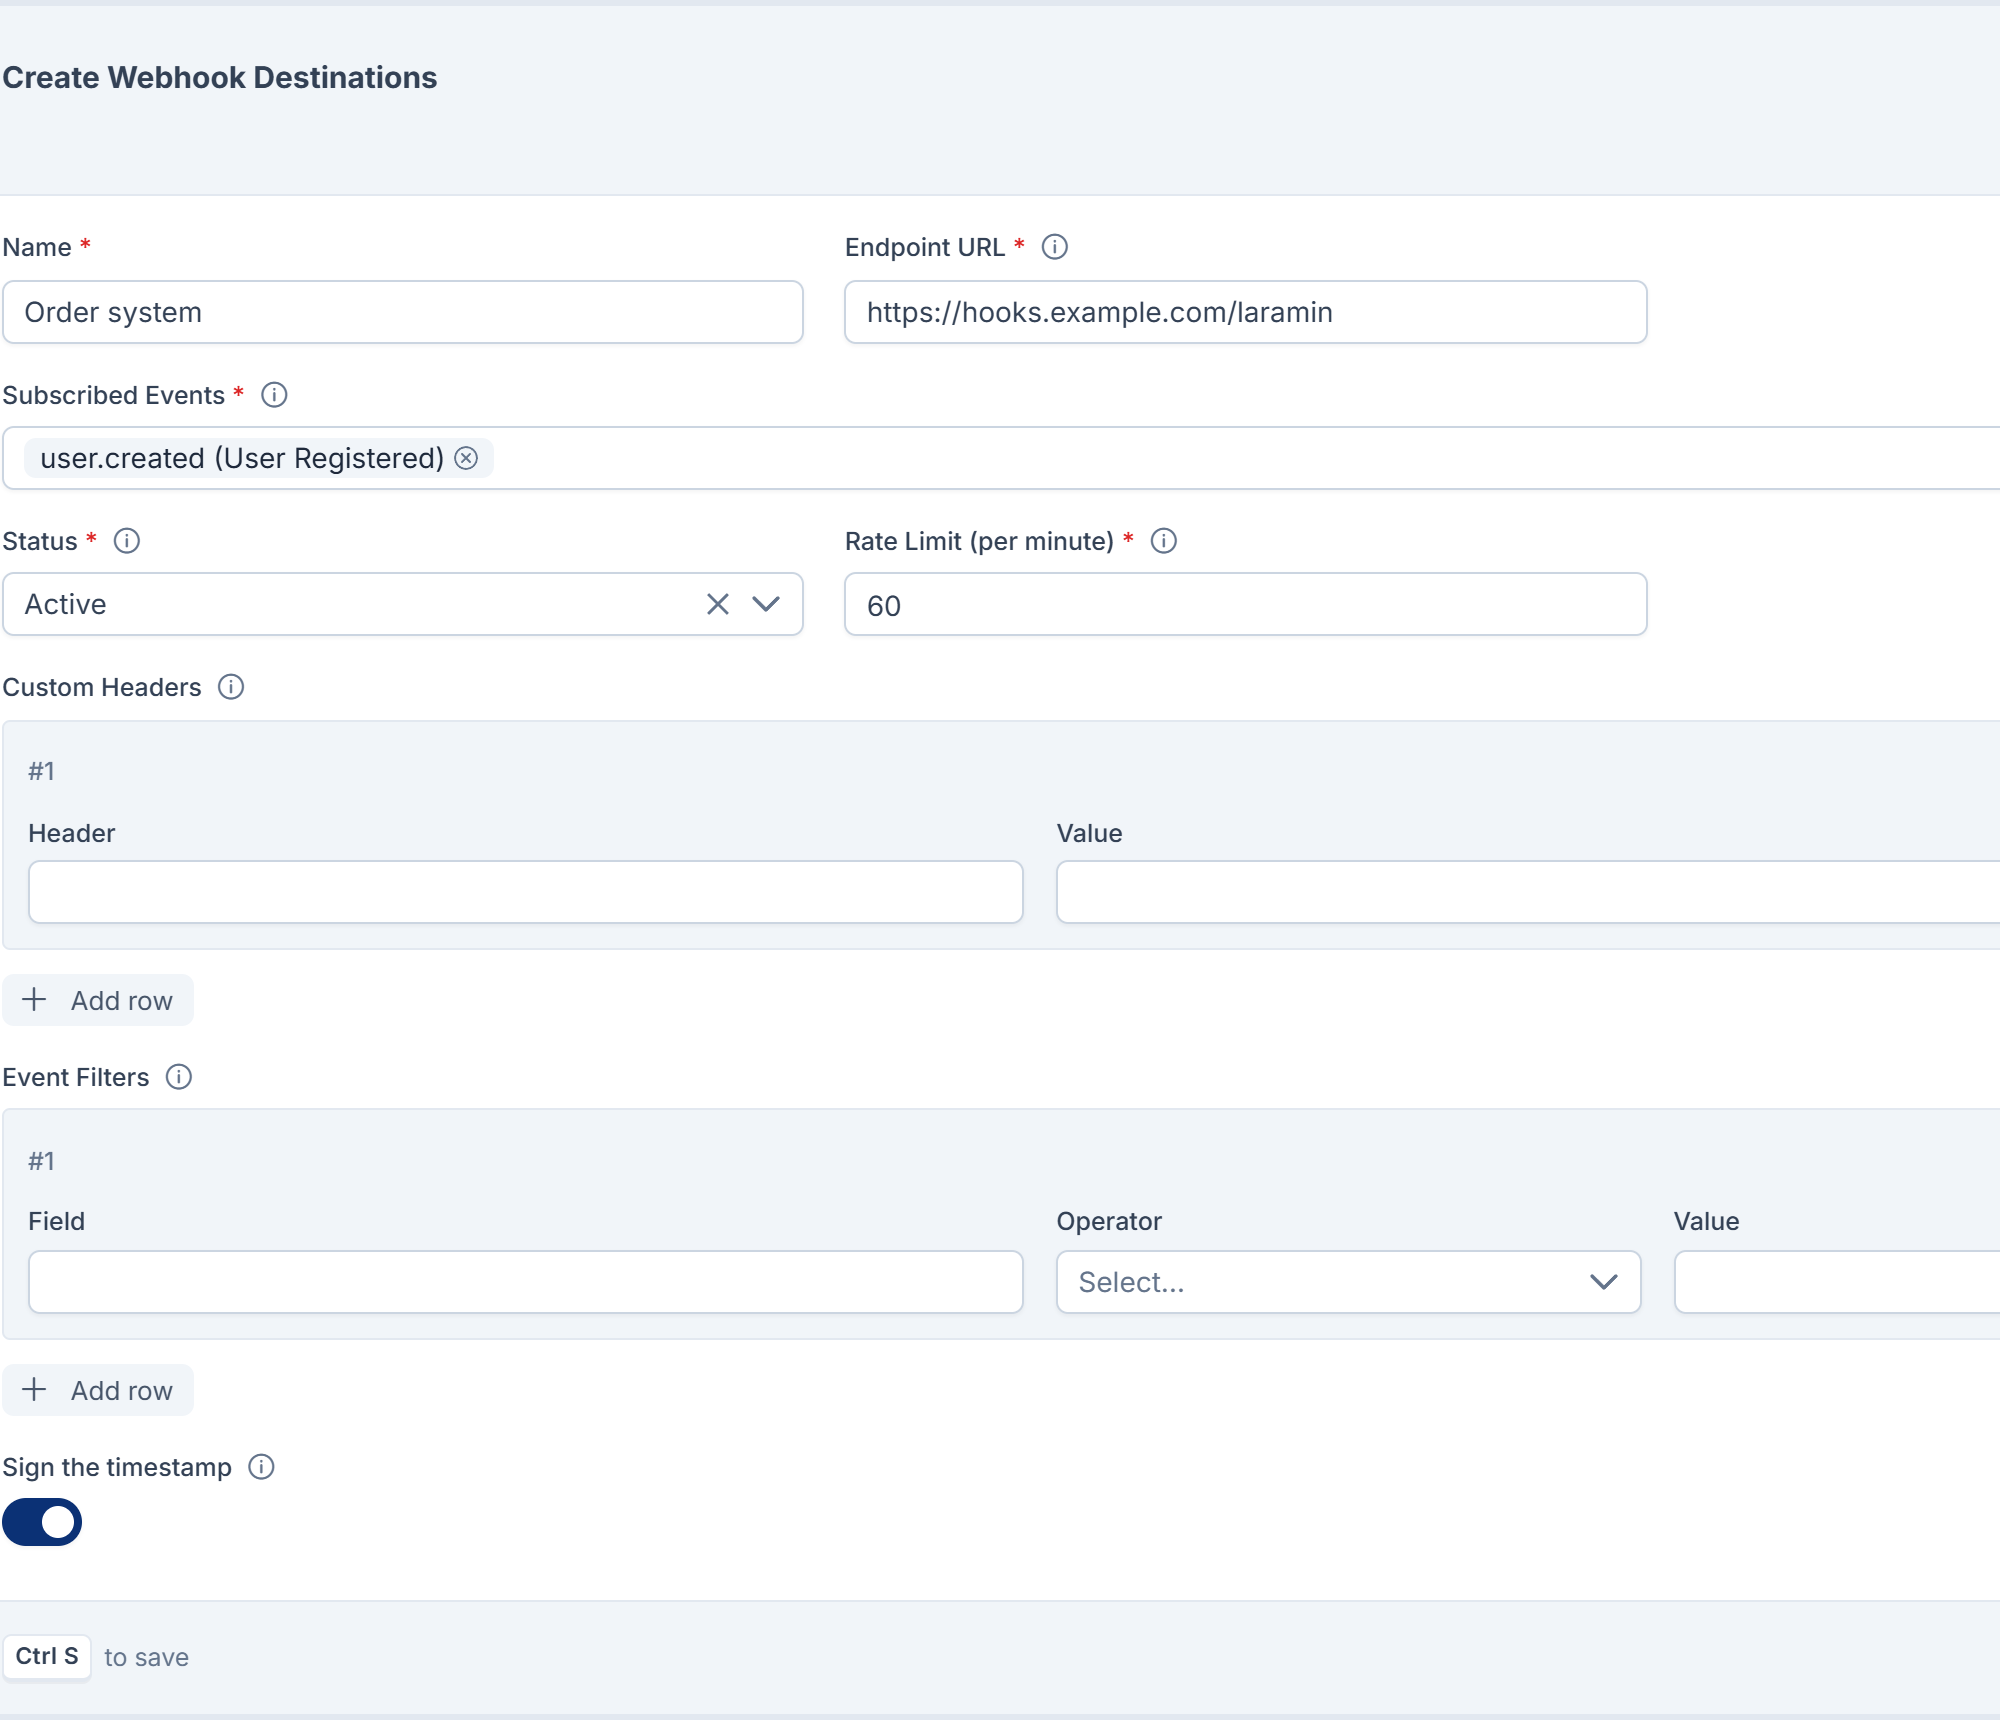
In Name, enter a name you'll recognize in the delivery log, such as
Order system. -
In Endpoint URL, enter the receiving address. Use an
https://address: the payload can include names and email addresses. -
In Subscribed Events, choose the events this system should receive, for example
user.created. You must choose at least one. -
Leave Status on Active. Choose Inactive to set the destination up now and start sending later.
-
In Rate Limit (per minute), leave
60unless the receiver asks for fewer requests. Deliveries to this destination are spaced out to stay within it. -
Optional: under Custom Headers, add any header the receiver needs, such as an API key it expects. Enter the name in Header and the value in Value.
-
Optional: under Event Filters, add rules to send only some events. See Send only some events below.
-
Leave Sign the timestamp on, unless the receiver only understands the older, payload-only signature.
-
Select Save.
You see Webhook destination Order system created successfully!, and the destination is listed with Status Active and Consecutive Failures 0. Your Laramin creates the destination's signing secret for you.
Careful: No screen shows the signing secret, not even once after saving. The receiver needs it to check signatures. See Verify webhook signatures and handle retries for what the receiver's developer can do.
Send only some events
Event Filters let a destination receive an event only when the record matches every rule. With no rules, it receives every event it subscribes to.
Each rule has a Field, an Operator (Equals or Not equals) and a Value:
- For
user.*,post.*andcategory.*events, Field is the name of a field on the record, as it appears in the payload'sdata, for exampleemail. The record is checked as it is after the change. - For Headless CMS events, Field is a key in the payload. Use a dot to reach a nested key, for example
entry.slugorspace. - Values are compared as text, loosely:
1matches a field stored as1ortrue. Letter case counts, soPublisheddoesn't matchpublished. - A rule with an empty Field is ignored.
For example, a destination subscribed to hcms. with the rule Field space, Equals, Value website hears only about entries published in the content space whose key is website.

Custom headers
- Each header is sent with every delivery and every test.
- If a custom header has the same name as one Webhook Engine sets, such as
X-,Laramin- Signature Content-TypeorUser-Agent, Webhook Engine's value is sent instead. - Header values are stored encrypted. They are, however, copied into each delivery's log entry, where anyone with View Log can read them. Prefer a dedicated key for the receiver over a password you use elsewhere.
Sign the timestamp
| Setting | What the receiver must check | Header sent |
|---|---|---|
| On (Timestamp signed) | The timestamp and the payload together. The receiver can refuse messages that are too old. | X- |
| Off (Payload only) | The payload only. A captured message would still pass the check if sent again. | No version header |
Destinations created before Webhook Engine 2.2.0 were set to Payload only when it was installed, so their receivers kept working. To protect one, have the receiver updated to accept version 2 first, then turn Sign the timestamp on. Turning it on before the receiver is ready makes every delivery fail its signature check.
Rate limit
Deliveries to one destination are spaced at least 60 ÷ Rate Limit seconds apart, rounded up to whole seconds. So any value above 60 behaves like 60: a destination receives at most about one new delivery per second. Retries of a failed delivery follow their own timing, not the rate limit.
Change, pause or remove a destination
- Change: open the row's actions menu and select Edit. Change the fields, then select Save. You see Webhook destination name updated successfully!
- Pause: edit it and set Status to Inactive. Deliveries already waiting are skipped, and nothing new is sent.
- Resume a suspended destination: edit it and set Status to Active. Consecutive Failures goes back to
0. - Delete: select Delete in the row's actions menu. The destination goes to the trash and receives nothing. Its delivery log stays.
- Restore: in the list's Trashed view, select Restore.
- Delete forever: in the Trashed view, select Delete forever and type the destination's name to confirm. This also deletes every delivery log entry for that destination, and can't be undone.
For the Trashed view and acting on several destinations at once, see Delete, restore and act on records in bulk.
What happens next
Test the destination to check that the receiver answers. Then make a change that fires one of its events and look for it in Webhook Engine › Delivery Logs.
Thanks. That helps us decide what to write next.
Thanks for telling us what was missing.
You already answered for this article today. Thanks.
We got a lot of answers from your network just now. Try again in a few minutes.
We couldn't send that. Check your connection and try again.
Links in this article
Printed from help.bsscn.com. The online article may have changed since.