Create a content schema and add its fields
Create a Single or a Collection, add fields of any of the 16 types, decide what editors fill in and what the API sends, and preview the form and the JSON before anything is published.
- Applies to
- Headless CMS 1.0 and later
- Who can do this
- Administrator
- Permission
feature.hcms. schema. create - Where
- Headless CMS › Content schemas
On this page
Before you start
- You need Create (
feature.) and Edit (hcms. schema. create feature.) on content schemas. The CMS Administrator role has both.hcms. schema.edit - Until an entry is first published, everything about a schema can change, including its key and type. After that its shape is locked. Plan the fields, and test with a draft before you publish. See How schema changes and versions keep applications working.
Steps
1. Create the schema
-
Open Headless CMS › Content schemas.
-
Select Create schema. On an empty list you can also choose a common one, such as Site header, Hero banners, Services, Testimonials, FAQs or Navigation menu, which fills in the name and type for you.
-
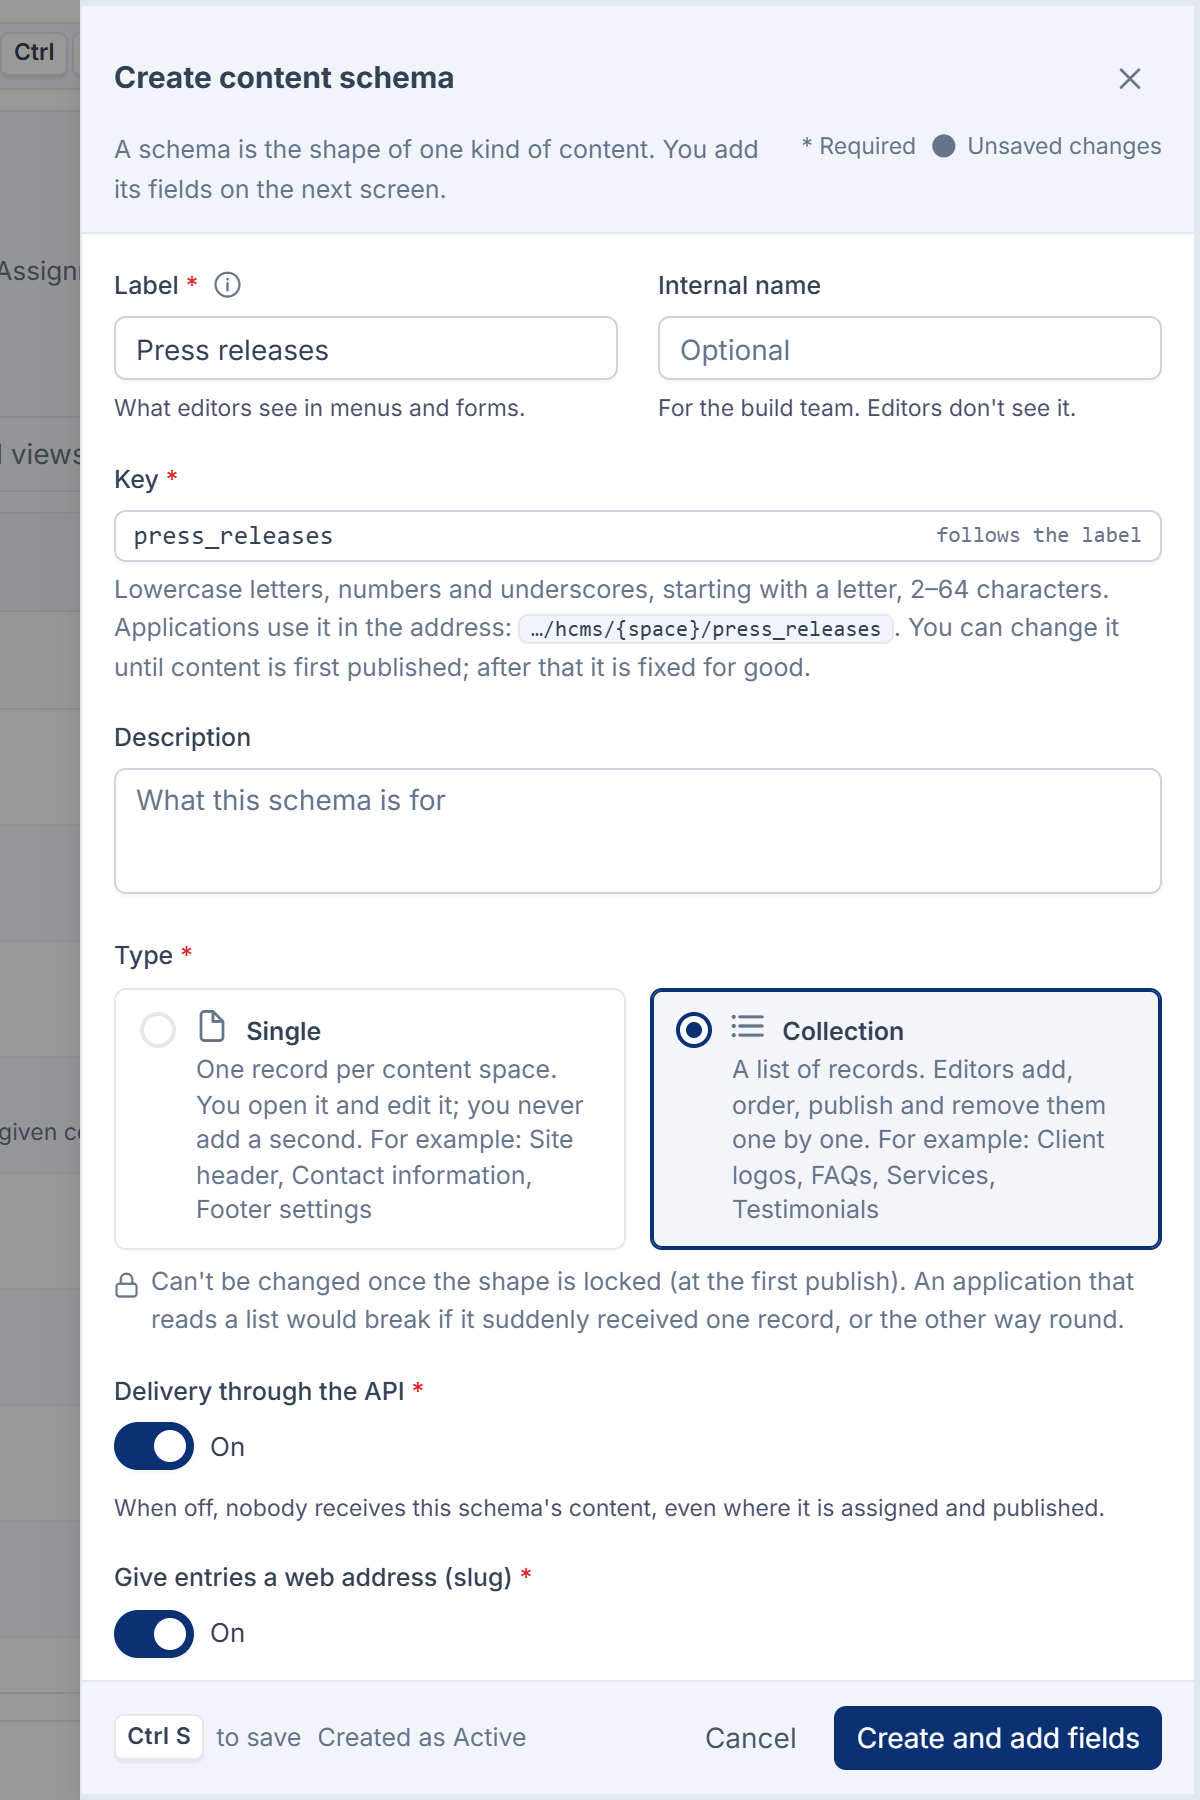
In Label, type what editors will see in menus and forms, for example
FAQs. You can change it at any time. -
Under Type, choose:
- Single: one record per content space. Editors open it and edit it, and never add a second. For example: Site header, Contact information, Footer settings.
- Collection: a list of records. Editors add, order, publish and remove them one by one. For example: Client logos, FAQs, Services, Testimonials.
-
Check Key. It follows the label, for example
faqs, and applications use it in the address. Use lowercase letters, numbers and underscores, starting with a letter, 2 to 64 characters.search,meta,schemas,previewandhealthare reserved. -
Optional: fill in Internal name, a name for your build team that editors don't see, and Description.
-
For a Collection, choose whether to Give entries a web address (slug), so an application can open one entry directly at
…/. You choose which field the address is made from after adding fields.faqs/ opening-hours -
Leave Delivery through the API on. When it's off, nobody receives this schema's content, even where it's assigned and published.
-
Select Create and add fields.
The schema is created as Active and its page opens on the Fields tab.
2. Add fields
-
On an empty schema, select Add these 3 fields to start with Title, Description and Image, or select Add field.
-
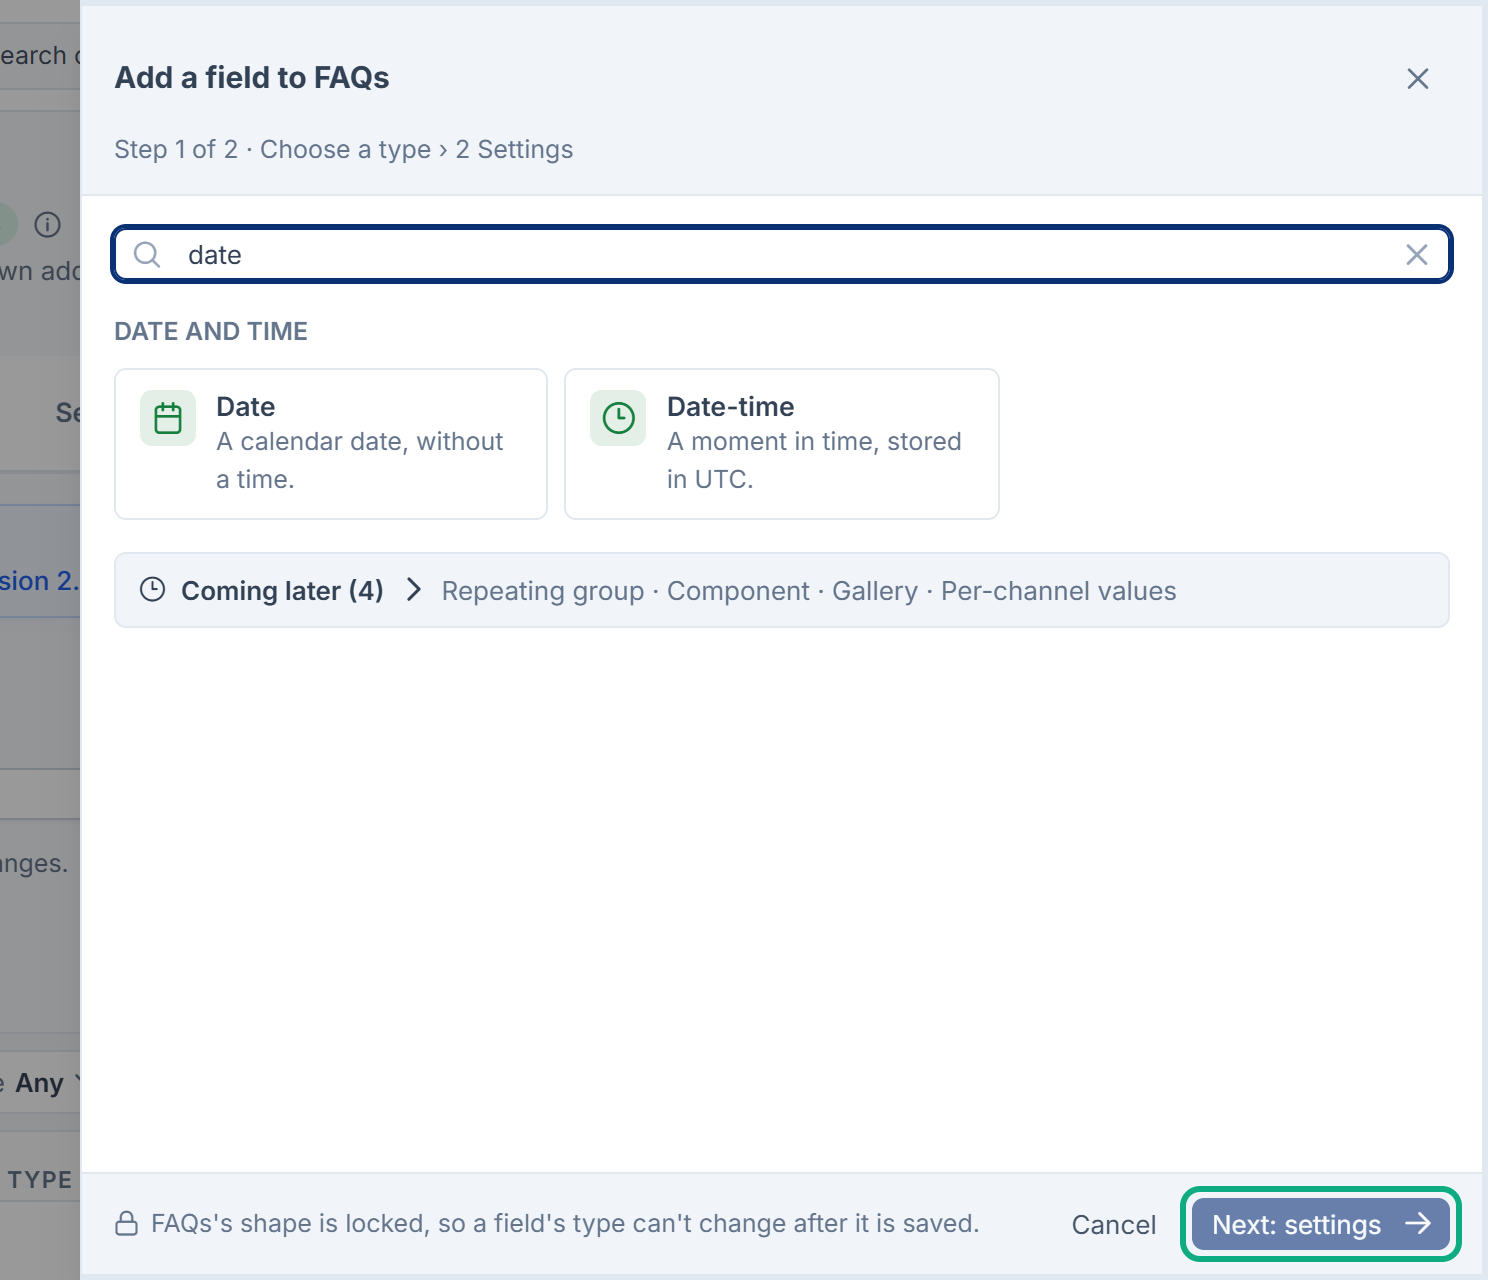
Choose a type. Type in Search field types to find one, for example "price" or "date". Then select Next: settings.
-
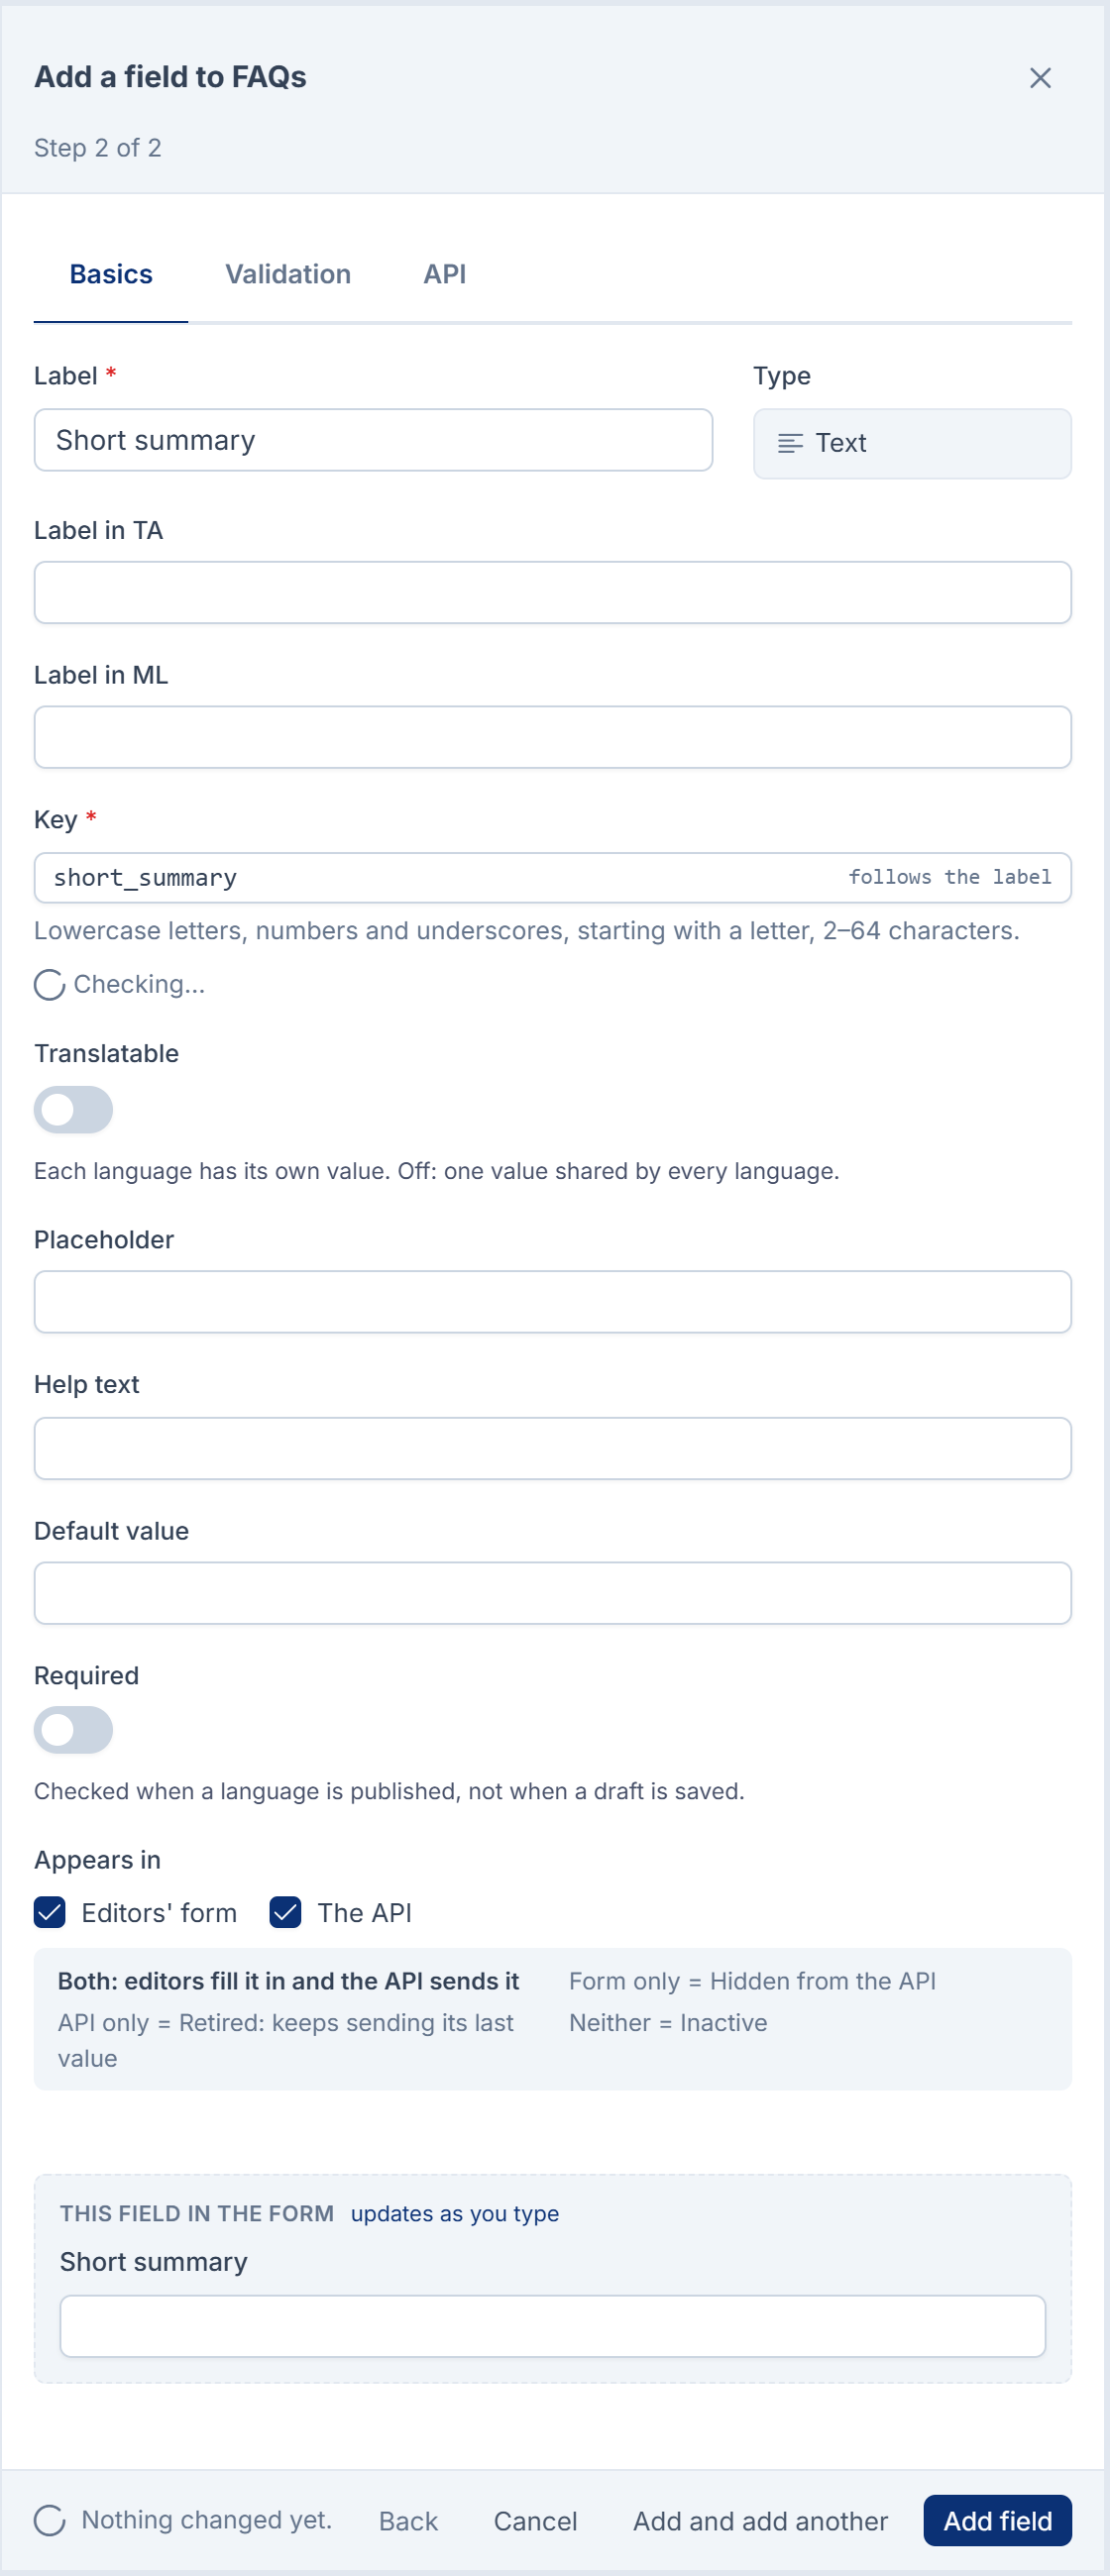
On Basics:
- Label: what editors see. Key follows it, and is the name the API sends the value under.
- Help text and Placeholder: guidance in the form.
- Required: checked when a language is published, not when a draft is saved.
- Translatable: each language has its own value. Off: one value shared by every language. Numbers, Boolean, dates and Reference are always shared.
- Appears in: tick Editors' form, The API, or both. A field only on the form is hidden from the API, for example an internal note.
-
On Validation, set the rules, such as Shortest and Longest, a Format such as Phone number, or Lowest and Highest for numbers. Size limits default to Headless CMS settings and can't go above their fixed ceilings.
-
For Select and Multi-select, add the options on Choices: each has a Value, which applications match on and never changes, and a Label per language.
-
On API, choose the API format, for example HTML or Blocks for rich text.
-
Select Add field, or Add and add another.
3. Order the fields and name the entries
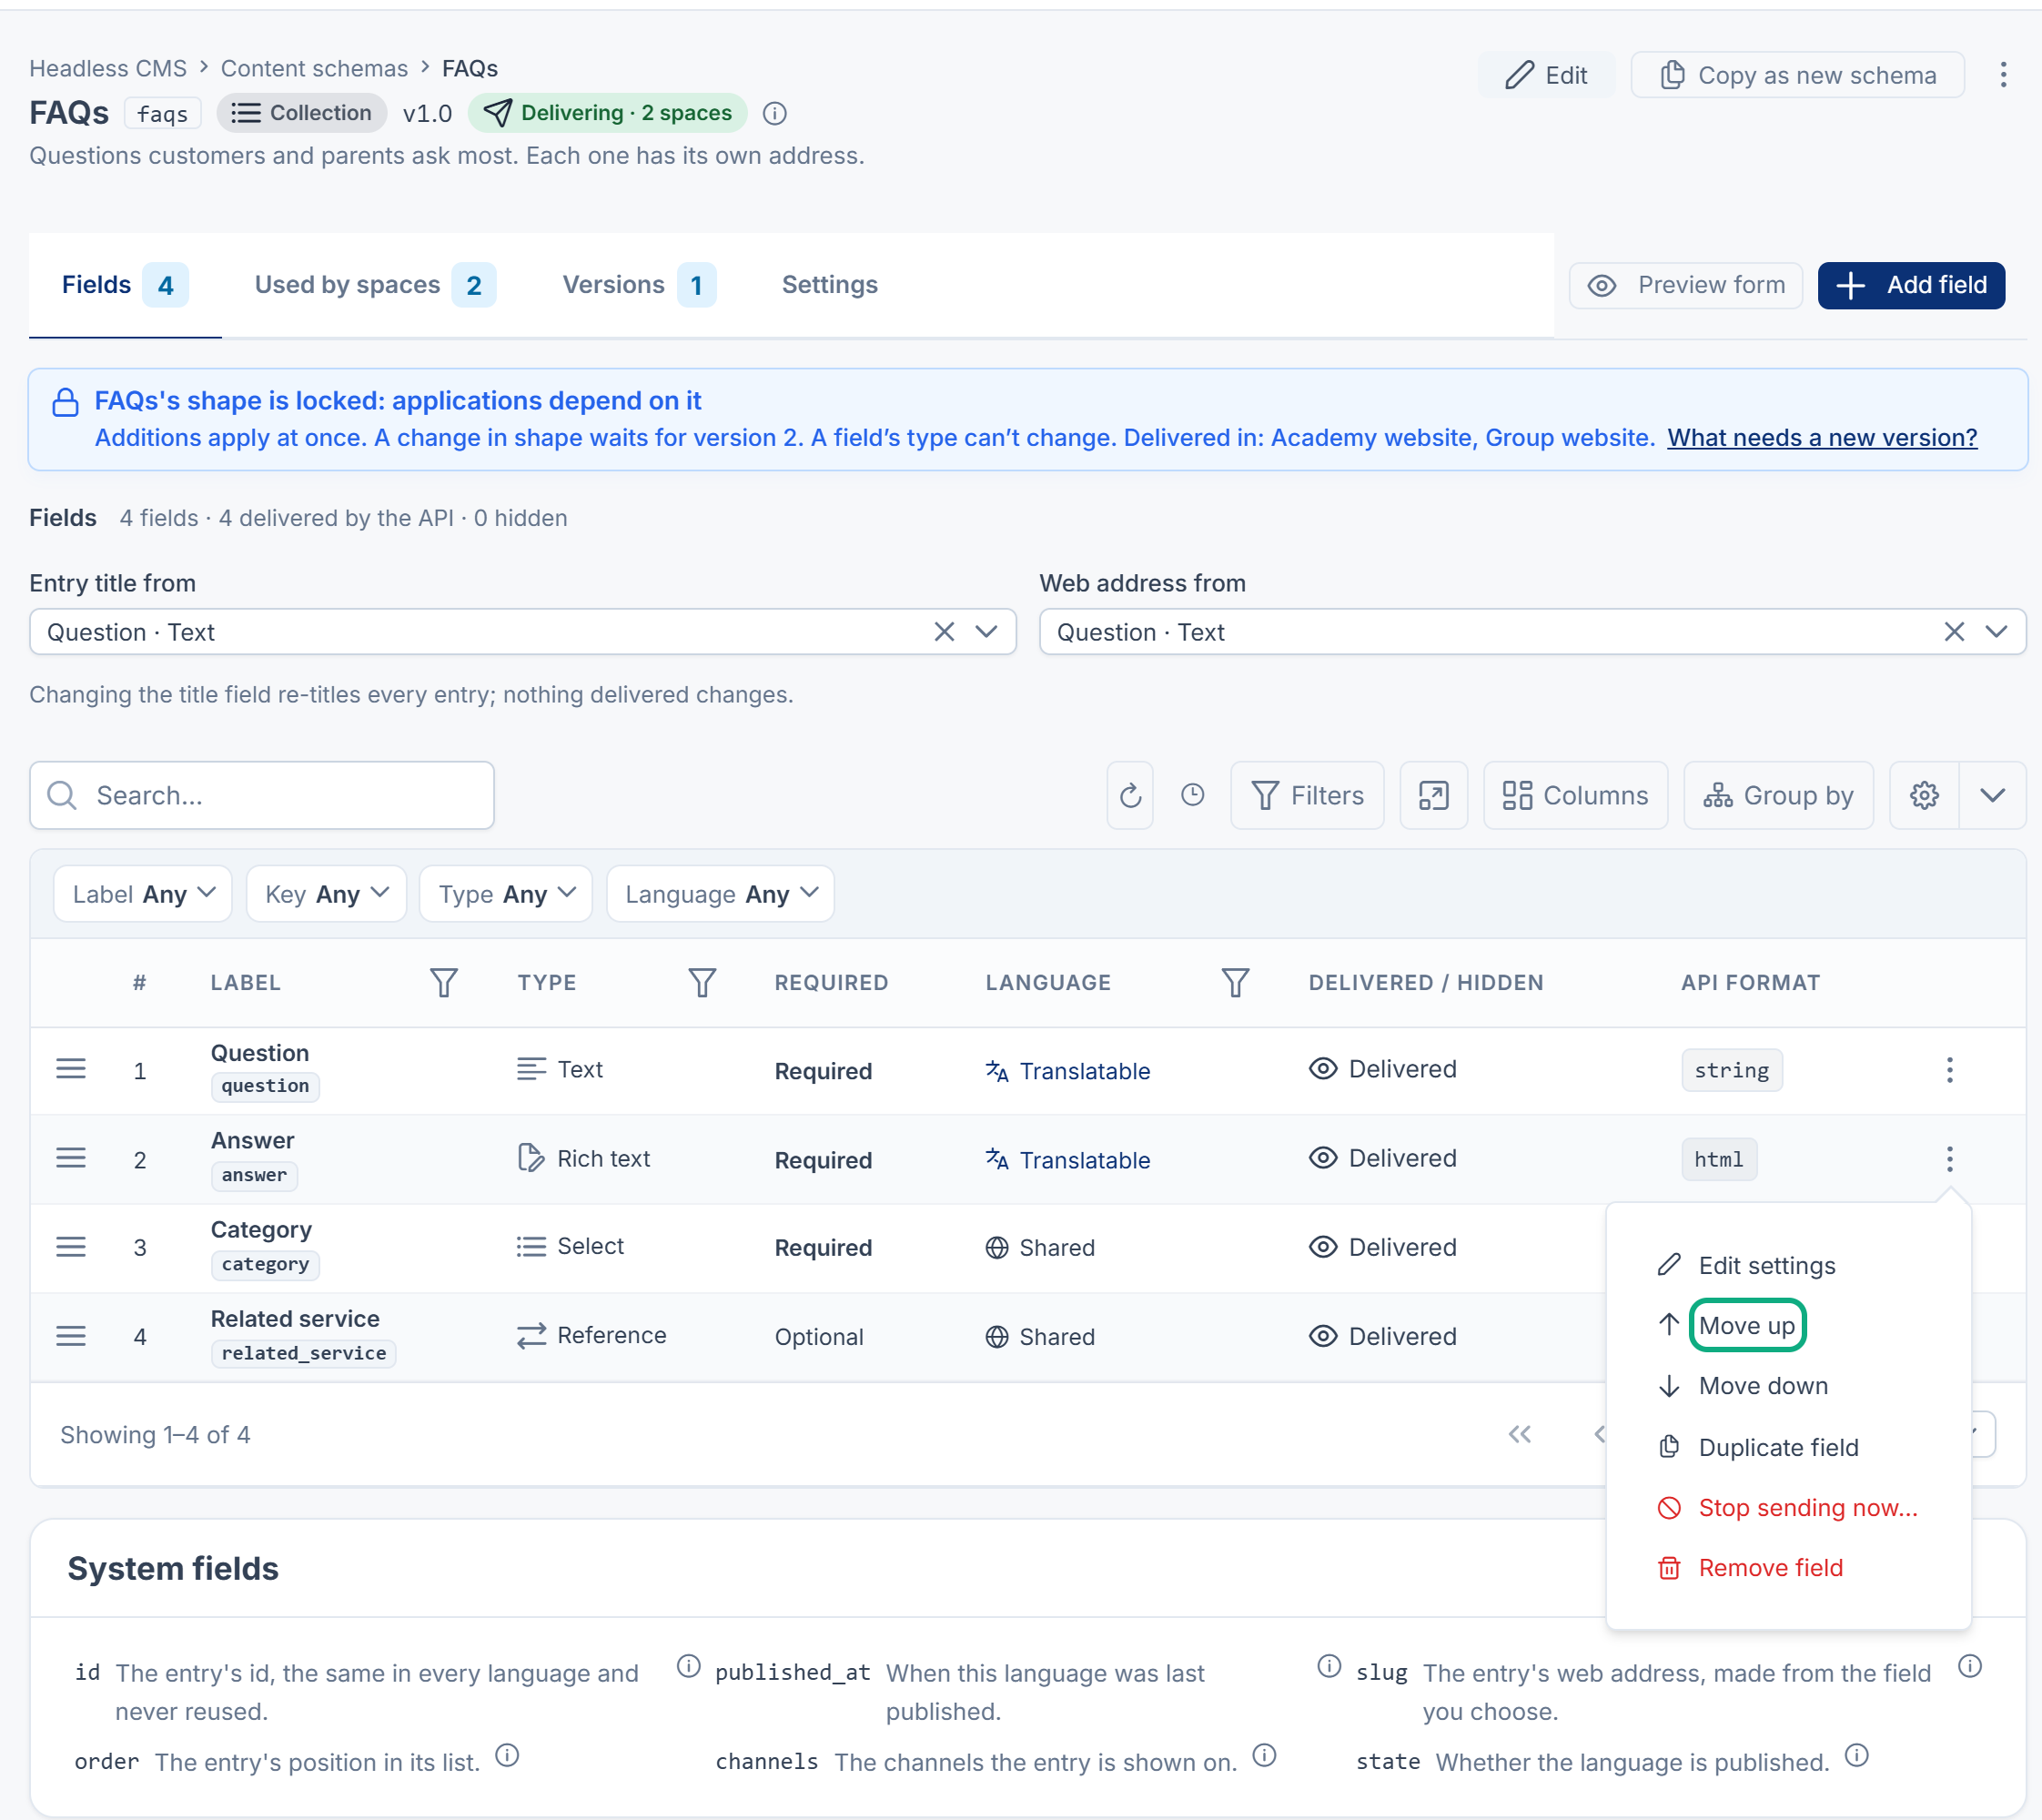
- Use Move up and Move down to order the fields. The form and the API follow this order.
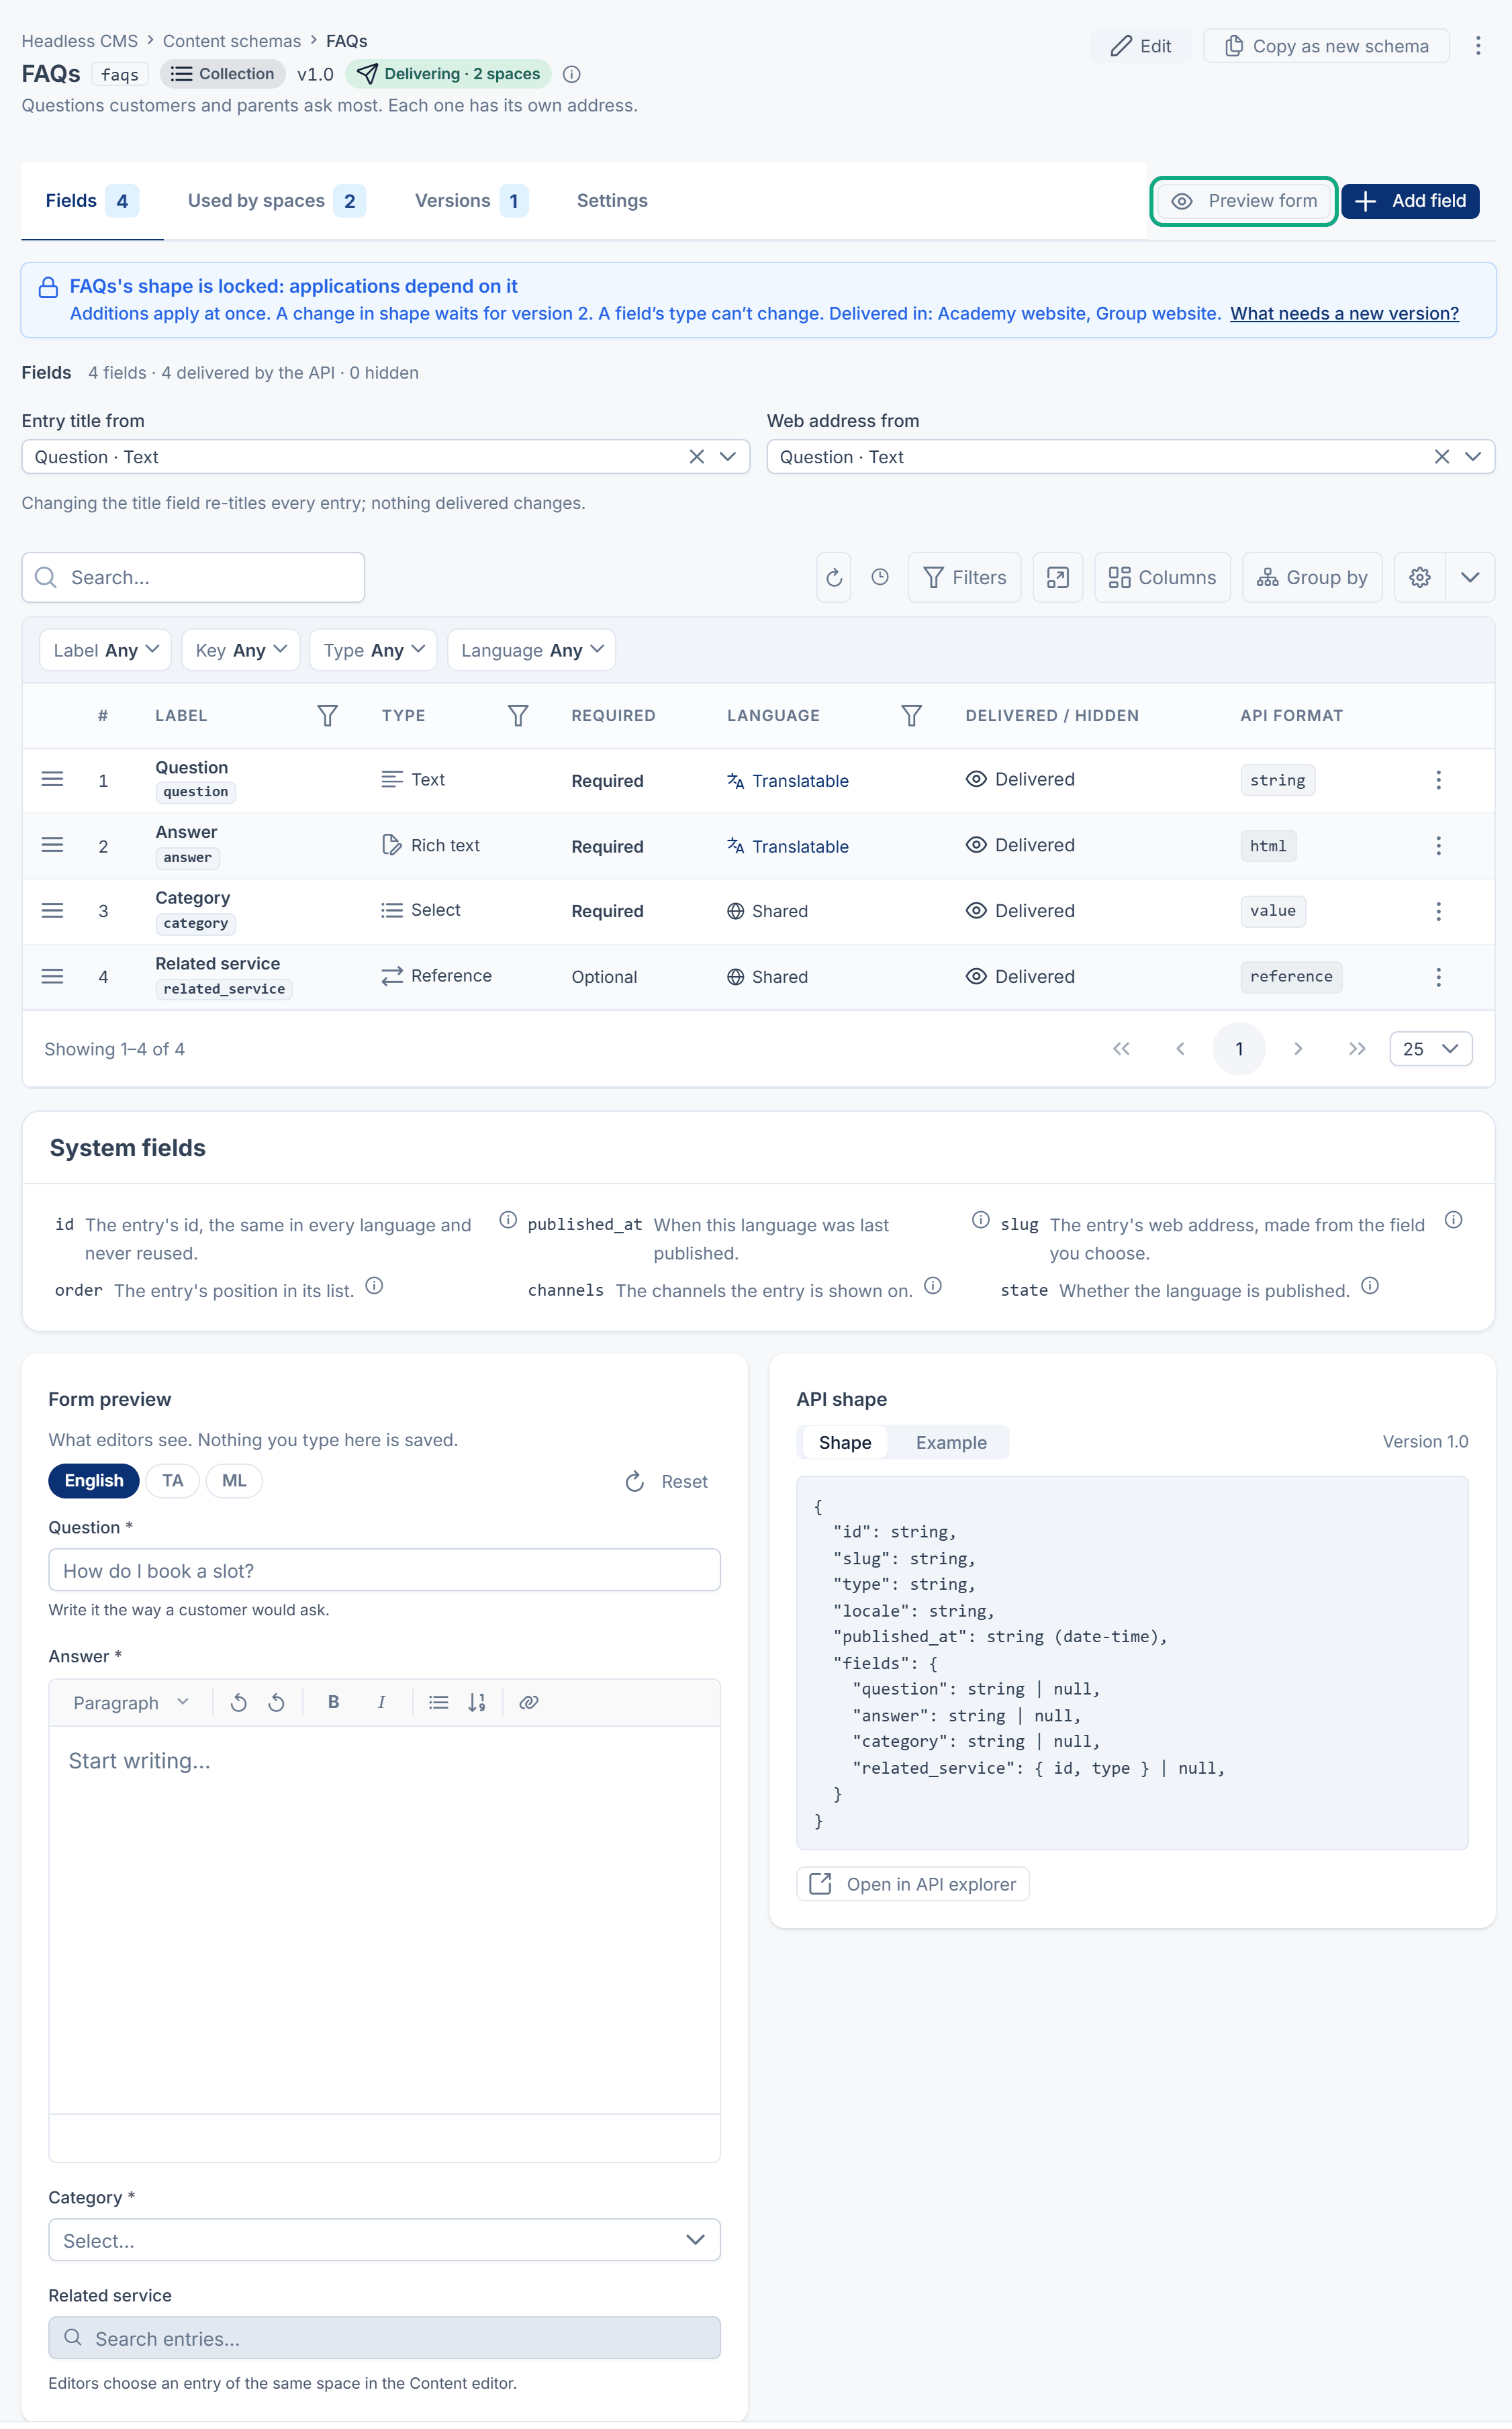
- Entry title from picks the field that names each entry in lists. Web address from picks the field the address is made from. Both default to the first Text field, and only an active Text field can be chosen.
4. Check the form and the JSON
The schema page shows three panes:
- Form preview: what editors see. Select Preview form to try every control, and Fill with an example. Nothing is saved, and uploads are discarded.
- API shape: the JSON an application will receive.
- Example: a real published entry, once a space has one. Select Open in API explorer to run the request.
Field types
| Type | For | API format |
|---|---|---|
| Text | A short line: a name, a heading, a phone number. | Text |
| Textarea | Several lines of plain text. | Text |
| Rich text | Formatted text with headings, lists and links. Choose Allowed features. | HTML (cleaned, ready to place in a page) or Blocks (the structured document) |
| An email address, checked as one. | Text | |
| URL | A web address, checked for safety. | Text |
| Integer | A whole number: a count, a year, a rank. | Number or Text |
| Decimal | A number with fixed decimal places: a price, a rating. | Number or Text |
| Boolean | A switch: on or off. | True / false |
| Select | One choice from a list you define. | Value, or Value and label |
| Multi-select | Several choices from a list you define. | Values, or Values and labels |
| Date | A calendar date, without a time. | Date (YYYY-MM-DD) |
| Date-time | A moment in time, stored in UTC. | Date-time (ISO 8601, UTC) or Timestamp |
| Image | A picture, with alt text and size limits. | Image object (address, alt text and size) or Address only |
| File | A document to download: PDF, spreadsheet and the like. | File object or Address only |
| JSON | Structured data, sent as it's stored. | JSON |
| Reference | A link to an entry of another schema, in the same space. | Entry (expanded with ?include=) or Id only |
Use as a filter in the content list is offered for Select, Multi-select, Boolean, Date and Integer, so editors can filter the list by that field. SVG images are off for safety.
Manage a schema
From the schema's row or page:
- Edit: change the label, internal name, description, position in lists and the API switch. The key and type are fixed once the shape is locked.
- Copy as new schema: copies the fields with their rules and API format, the description, the web address setting and the API switch. Content, assignments and versions aren't copied. Use it when you need a different type or a fresh start.
- Delivery through the API off: stops this schema's content reaching anyone, in every space, while editors keep working. It asks first and offers Undo.
- Deactivate: stops delivery everywhere and makes the content read-only. Nothing is deleted, and Activate brings back the same addresses and content.
- Move to trash: only once the schema is removed from every space in Assignments, and no other schema's Reference field points at it.
- Export definitions and Import definitions: move schemas between installations as a
.jsonfile. The file holds definitions only, never content. The import shows a preview and lets you choose, for each schema, to create it, replace it, import it under a new key, or skip it. Export needsfeature., and importhcms. schema. export feature..hcms. schema. import
A schema's key, and each field's key, are reserved for good, even after it's removed, so an application never receives different content at the same address.
What happens next
Assign the schema to a content space so editors can fill it in. See Set up a content space and deliver your first content. Once an entry is published, changes follow the version rules in How schema changes and versions keep applications working.
Thanks. That helps us decide what to write next.
Thanks for telling us what was missing.
You already answered for this article today. Thanks.
We got a lot of answers from your network just now. Try again in a few minutes.
We couldn't send that. Check your connection and try again.
Links in this article
Printed from help.bsscn.com. The online article may have changed since.